Easy Snowflake Crafts for Kids: Simple Winter Joy
 By Speech Blubs Team•Jan 13, 2026•19 min.
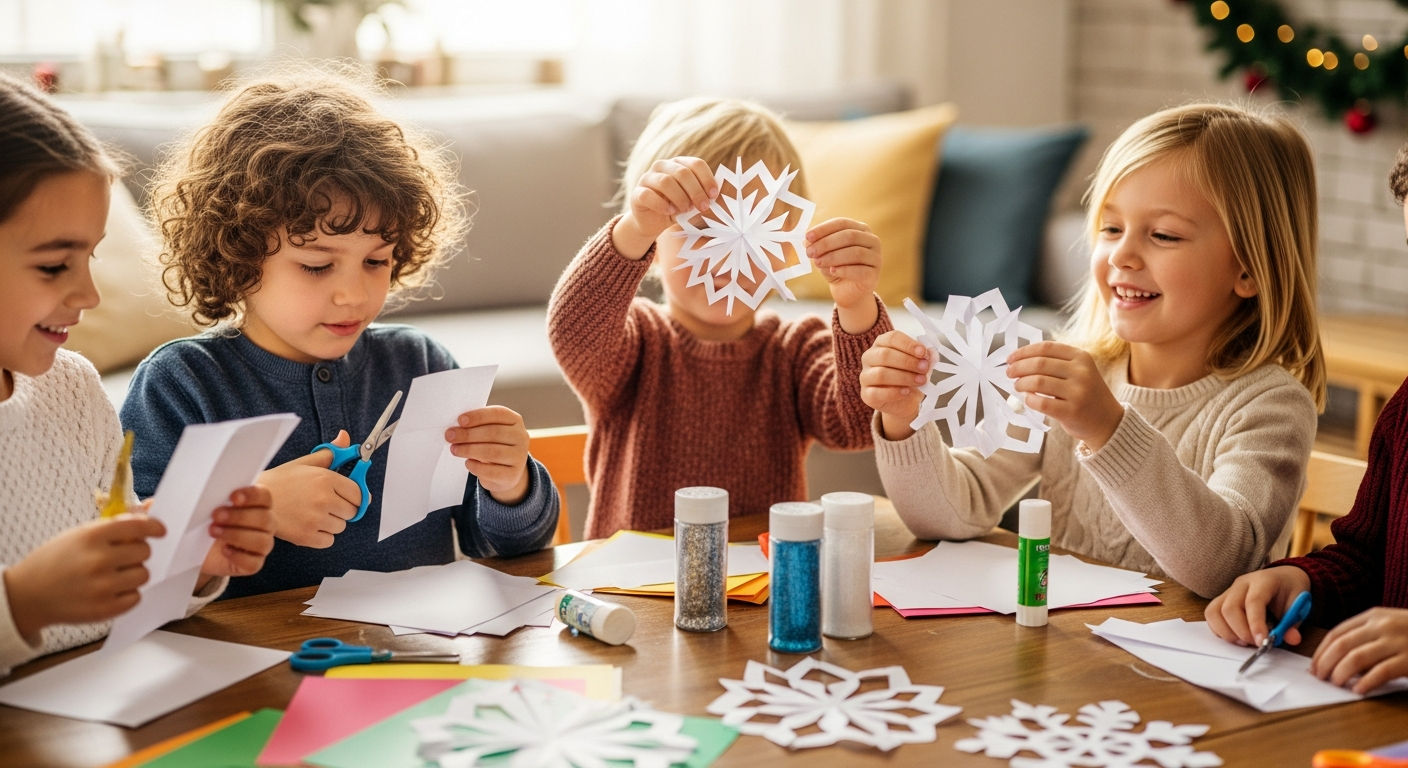
Table of Contents
- Why Snowflake Crafts Are More Than Just Fun
- Snowflake Crafts for Our Littlest Builders (Toddlers & Preschoolers)
- Creative Snowflakes for Elementary Explorers
- Beyond the Craft: Fostering Communication During Play
- Supporting Speech Development with Smart Screen Time
- The Speech Blubs Difference: Value and Plans
- Conclusion
- Frequently Asked Questions (FAQ)
Picture this: soft snow falling outside, a warm home inside, and the joyous sound of children's laughter as tiny hands create beautiful, frosty masterpieces. Winter crafts, especially snowflake crafts, bring a unique magic to the season, transforming ordinary days into opportunities for creativity and connection. But beyond the glitter and glue, these simple activities hold a profound power – they are incredible tools for fostering critical developmental skills, from fine motor coordination to, most importantly, language and communication.
In this comprehensive guide, we'll dive into a treasury of easy snowflake crafts suitable for every age group, from the littlest toddlers to elementary-aged artists. We'll show you how to turn readily available materials into stunning winter decorations and, more importantly, how to leverage each crafting moment to spark conversation, expand vocabulary, and build confidence in your child's communication abilities. Get ready to transform your home into a winter wonderland while empowering your child to "speak their minds and hearts" through the simple joy of making.
Why Snowflake Crafts Are More Than Just Fun
Engaging in creative activities like making snowflake crafts offers a wealth of developmental benefits that extend far beyond simply producing a pretty decoration. For children of all ages, these seemingly simple projects are powerful learning experiences:
- Fine Motor Skill Development: From gripping scissors and carefully cutting paper to painting delicate lines and threading small beads, snowflake crafts are a fantastic workout for tiny hands and fingers. These activities strengthen the small muscles required for writing, self-feeding, and dressing.
- Creativity and Imagination: Each snowflake is unique, just like every child. These crafts encourage children to express themselves, experiment with designs, and embrace their own artistic vision without the pressure of a "right" or "wrong" outcome.
- Cognitive Skills and Problem-Solving: Following multi-step instructions, understanding concepts like symmetry, and figuring out how different materials behave all contribute to a child's cognitive development. When a child encounters a challenge during crafting, like how to make a specific cut, they engage in valuable problem-solving.
- Sensory Exploration: Snowflake crafts invite children to touch, feel, and manipulate a variety of textures – the softness of cotton balls, the stickiness of glue, the smoothness of paper, the coolness of paint. This sensory input is vital for brain development and helps children understand their world.
- Language and Communication: Perhaps one of the most significant, yet often overlooked, benefits of crafting is the rich opportunity it provides for language development. As children engage with materials and create, they describe what they're doing, ask questions, follow directions, and express their ideas and feelings. This natural conversational context is a prime environment for expanding vocabulary, practicing articulation, and building narrative skills.
For a parent whose child might be shy, a late talker, or needs a little extra encouragement to articulate their thoughts, these crafting sessions become informal "speech therapy" playgrounds. The shared experience builds connection, reduces pressure, and makes communication feel like a natural extension of play. If you're wondering whether your child could benefit from a little extra support in their communication journey, we invite you to take our quick 3-minute preliminary screener to get a simple assessment and a free 7-day trial of Speech Blubs.
Snowflake Crafts for Our Littlest Builders (Toddlers & Preschoolers)
Crafting with toddlers and preschoolers is all about simplicity, sensory engagement, and allowing for plenty of open-ended exploration. The goal isn't perfection, but participation and the joy of creation.
Cotton Ball Snowflakes
This classic craft is perfect for tiny hands and offers wonderful opportunities for sensory and language development.
Materials:
- Construction paper (dark blue or black works wonderfully as a winter sky backdrop)
- White liquid glue (poured into a shallow dish)
- A wide paintbrush (about 1 inch)
- Plenty of cotton balls
Steps:
- Prepare the Glue: Pour a generous amount of white glue into a small, shallow dish. This allows your child to dip the paintbrush easily.
- Paint the Snowflake: Help your child use the paintbrush to "paint" the shape of a snowflake onto the construction paper. This can be as simple as a central blob with radiating lines or more elaborate star shapes, depending on their age and skill.
- Add Cotton Balls: Invite your child to pick up cotton balls and stick them onto the wet glue. Encourage them to cover all the glue lines to make a fluffy, three-dimensional snowflake.
- Language rich play: As they work, describe the textures and actions: "Feel how soft the cotton is!" "The glue is so sticky!" "Let's stick another one!" You can practice words like "fluffy," "white," "cold," "stick," and "more." For a child working on early words, even just imitating "mmm" while touching the soft cotton can be a great starting point.
- Dry and Display: Let the snowflake dry completely. If you like, you can carefully cut around the finished snowflake and glue it onto a second piece of paper for extra strength before hanging it up.
Pipe Cleaner & Bead Snowflakes
This craft is fantastic for developing fine motor skills and hand-eye coordination.
Materials:
- White, silver, or light blue pipe cleaners
- Pony beads (white, clear, silver, or blue are great for a winter theme)
Steps:
- Form the Base: Help your child twist two or three pipe cleaners together in the center to form a star or asterisk shape, which will be the base of your snowflake.
- Thread the Beads: Guide your child to thread pony beads onto each "arm" of the pipe cleaner snowflake. This requires precision and patience, enhancing bilateral coordination (using both hands together).
- Secure the Beads: Once they've added enough beads, simply bend the very end of each pipe cleaner arm to prevent the beads from sliding off.
- Talk about it: Use this opportunity to practice naming colors and counting beads. "How many blue beads did you add?" "Can you add one more white bead?" For a child working on sequential directions, "First, twist the pipe cleaners. Next, add the beads."
Dot Sticker Snowflakes
This mess-free activity is wonderful for toddlers and preschoolers who are developing their pincer grasp.
Materials:
- Dark-colored construction paper (black, dark blue)
- Dot stickers (white, silver, light blue work best)
Steps:
- Provide the Canvas: Give your child a piece of dark paper.
- Stick Away: Let your child peel and stick the dot stickers onto the paper to create their own snowflake designs. Encourage them to make patterns, radiating lines, or just stick them wherever they like!
- Observe and Describe: Point out how the dots form a pattern. "Look, you made a pattern!" "That dot is big, and that one is small." You can work on spatial concepts like "on," "off," "next to."
Creative Snowflakes for Elementary Explorers
Children in elementary school are ready for more complex instructions, finer motor challenges, and the satisfaction of creating more intricate designs. These crafts offer wonderful opportunities for structured learning mixed with creative freedom.
The Classic 6-Pointed Paper Snowflake
This is the quintessential snowflake craft, and mastering the folds for six points makes it even more authentic, as real snowflakes naturally form with six points.
Materials:
- Standard copy paper (8.5x11 inches)
- Sharp scissors
Steps:
- Make a Square: Start with a square piece of paper. If you have a rectangular piece, fold one corner down to the opposite edge to form a triangle, and trim off the excess paper strip.
- First Diagonal Fold: Fold the square of paper diagonally in half to create a large triangle.
- Second Fold: Fold this larger triangle in half again to make a smaller triangle.
- Folding into Thirds (The Tricky Part!): This is the key to six points. Imagine this small triangle divided into three equal sections. Fold the right "third" of the triangle over, aligning its edge with the imaginary line. Then, fold the left "third" over, aiming to make it symmetrical with the first fold. All edges should align as closely as possible, forming a narrow, pointed shape. This step often takes practice to get right!
- Cut the Top Angle: Flip your folded paper over. Cut off the top of the folded paper at an angle. Make sure you cut through all layers of paper to create a clean, even edge. This cut will determine the shape of the outer points of your snowflake.
- Shape It! Now comes the creative part! Begin cutting small shapes – triangles, curves, squares – from the sides of the folded paper. Be careful not to cut all the way from one side to the other, or your snowflake will fall apart! Experiment with different shapes and sizes of cuts.
- Unfold with Care: Gently unfold your paper to reveal your unique six-pointed snowflake! It may not lie perfectly flat immediately; you can place it under a heavy book for a while or even carefully iron it (between two pieces of plain paper, no steam!) for a crisper finish.
As you work, discuss concepts like "symmetry," "angles," and "geometric shapes." "Look at how the triangles repeat themselves!" "Can you make a curved cut here?" This process supports problem-solving and spatial reasoning, and the pride in the finished product is immense.
Salt Painting Snowflakes
Combine art and science with this mesmerizing craft that creates textured, sparkling snowflakes.
Materials:
- Thick cardstock or watercolor paper
- White school glue (e.g., Elmer's Glue)
- Salt (table salt or Epsom salt for bigger crystals)
- Liquid watercolors or diluted food coloring
- A small paintbrush
- A cup of water
Steps:
- Draw with Glue: Use the white glue to draw a snowflake design onto the cardstock. Make sure the glue lines are thick enough to hold the salt.
- Sprinkle with Salt: Generously sprinkle salt over all the glue lines. Gently shake off any excess salt.
- Let Dry Slightly: Allow the glue and salt to dry for about 10-15 minutes, until the glue is no longer dripping wet but still a bit tacky.
- Add Color: Dip your paintbrush into the liquid watercolors (or diluted food coloring) and gently touch the tip of the wet brush to the salt lines. Watch in amazement as the color "blooms" and spreads through the salt crystals!
- Dry Completely: Let your beautiful salt-painted snowflake dry flat for several hours or overnight.
This craft is a fantastic way to observe cause and effect ("What happens when the color touches the salt?") and explore descriptive language related to appearance: "It's so sparkly!" "Look at how the colors mix!"
Coffee Filter Snowflakes
An easier cutting option, perfect for younger elementary children or those who find regular paper too stiff.
Materials:
- Round coffee filters
- Scissors
- Markers or liquid watercolors (optional, for decorating)
Steps:
- Fold the Filter: Start by folding a coffee filter in half, then in half again, and a third time (like folding a paper plate in half, three times). This will create a wedge shape.
- Cut Designs: With scissors, cut small shapes out of the folded edges. Because coffee filters are thin, they're much easier to cut through multiple layers than regular paper.
- Unfold: Carefully unfold your coffee filter to reveal a delicate, intricate snowflake.
- Decorate (Optional): If desired, use markers to add color or gently dab with liquid watercolors for a beautiful stained-glass effect.
This activity reinforces fine motor skills and encourages creative design without the frustration of thick paper. You can discuss "lightness," "delicate," and the different "patterns" created by their cuts.
Popsicle Stick Snowflakes
A sturdy, versatile craft that allows for endless decorative possibilities.
Materials:
- Popsicle sticks (regular or jumbo)
- White school glue or hot glue (adult supervision required for hot glue)
- Decorations: glitter, buttons, sequins, small pom-poms, paint, craft gems
Steps:
- Arrange the Base: Arrange 3-4 popsicle sticks into a snowflake shape (e.g., two crossing each other to form an 'X', with a third crossing horizontally).
- Glue Together: Securely glue the sticks together in the center. Allow plenty of time to dry if using school glue.
- Decorate: Once the base is dry, let your child unleash their creativity by painting, glittering, or gluing on various small decorations.
- Display: These make lovely ornaments, window decorations, or gift toppers.
This craft is excellent for spatial reasoning, counting the sticks, and naming all the different decorative items. "How many buttons did you use?" "Let's put some sparkly glitter here!"
3D Paper Snowflakes
For a slightly more advanced challenge, 3D snowflakes create an impressive visual effect.
Materials:
- 6 square pieces of paper (6x6 inches works well)
- Ruler
- Pencil
- Scissors
- Stapler or glue
- Paper clips (optional, for holding pieces while glue dries)
Steps:
- Prepare the Squares: Take one square and fold it diagonally in half to make a triangle.
- Draw Cut Lines: Using a ruler and pencil, draw three lines parallel to the folded edge, starting from the folded edge and stopping about a quarter-inch from the opposite edge. Space these lines evenly.
- Cut the Lines: Carefully cut along these drawn lines, but do not cut all the way through! Stop at your pencil marks.
- Unfold: Unfold the paper. You'll have a square with a series of parallel cuts radiating from the center.
- Roll and Glue/Staple:
- Take the innermost two paper strips and roll them together to form a tube. Glue or staple them at the seam.
- Flip the paper over. Take the next two strips and roll them together in the opposite direction. Glue or staple.
- Continue flipping and rolling alternating strips until all cuts are used. This creates a pointed, curled segment.
- Repeat: Repeat steps 1-5 for all 6 squares of paper, creating 6 identical segments.
- Assemble: Take three segments and staple or glue them together at their pointed ends, then staple them together at the center point. Repeat with the remaining three segments.
- Join Halves: Finally, join the two halves of your snowflake together by stapling or gluing them where they meet, both at the tips and in the center.
This craft challenges children to follow complex sequences, understand spatial relationships, and use more advanced fine motor skills. It's an opportunity to use sequential language: "First, we fold. Then, we cut. Next, we roll." And to describe the final product: "Look, it's 3D!" "It's so intricate!"
Beyond the Craft: Fostering Communication During Play
The real magic of these crafts isn't just in the making, but in the talking that happens alongside. Here's how you can actively foster your child's communication skills during your snowflake crafting sessions:
- Encourage Descriptive Language: Prompt your child to describe what they are doing, seeing, and feeling. Instead of just saying "Good job!", ask, "What color are you using?" or "How does the glitter feel?" Use rich vocabulary yourself: "Look at that sparkling snowflake!" or "This glue is tacky."
- Practice Following Multi-Step Directions: Give clear, sequential instructions: "First, pick up the scissors. Next, cut along the line. Then, show me what you've cut." For children who struggle with this, start with two-step directions and gradually increase complexity.
- Ask Open-Ended Questions: Move beyond "yes" or "no" questions. "Tell me about your snowflake," "What's your favorite part of making this?" "What do you want to do next?" These questions encourage longer responses and narrative skills.
- Share Experiences and Emotions: Model expressing your own thoughts and feelings. "I love how creative you are being!" "I feel happy when we make things together." This helps children connect words to emotions.
- Connect to the World: Talk about real snowflakes, the weather, winter animals, or other winter traditions. This expands their general knowledge and provides more vocabulary.
For children who might need an extra boost in these areas, Speech Blubs provides a wonderful complement to hands-on learning. Our app is designed to bridge the gap between playful interaction and targeted speech development, helping children translate the words they hear and say during crafts into confident communication.
Supporting Speech Development with Smart Screen Time
At Speech Blubs, we are driven by a singular mission: to empower children to "speak their minds and hearts." Our company was born from a deeply personal place; our founders all grew up with speech problems and created the exact tool they wished they had when they were young. We understand the challenges and frustrations parents face, and we are committed to providing an immediate, effective, and joyful solution for the 1 in 4 children who need speech support.
We blend scientific principles with play to create one-of-a-kind "smart screen time" experiences. Unlike passive viewing (like cartoons), Speech Blubs encourages active participation, making it a powerful tool for family connection and a screen-free alternative to endless scrolling.
The Power of Video Modeling
Our unique and highly effective approach centers around "video modeling," where children learn by watching and imitating their peers. This method taps into the brain's natural mirror neuron systems, making learning intuitive, engaging, and incredibly fun. When children see other kids their age performing speech exercises, making sounds, or articulating words, they are naturally motivated to mimic them. This fosters confidence, reduces self-consciousness, and makes learning feel like play.
Real-World Scenarios with Speech Blubs
Imagine your child has just crafted a beautiful, sparkly snowflake. Here's how Speech Blubs can extend that learning:
- Vocabulary Expansion: If your child loves the "sparkly" aspect, you can then explore Speech Blubs' "Colors & Shapes" or "Winter Wonderland" sections to reinforce words like "sparkle," "shine," "white," "cold," or "ice."
- Targeted Sound Practice: If your child struggles with the 's' sound (as in "snowflake," "sparkly," "scissors"), a targeted section in Speech Blubs can provide playful, peer-led exercises to practice that specific sound in various contexts.
- Following Directions & Sequencing: Many Speech Blubs activities involve following multi-step prompts, reinforcing the same skills practiced during crafting.
- Building Confidence: The app's positive, encouraging environment, filled with peer models, helps reduce frustration and builds a child's confidence in attempting new sounds and words. Our approach is backed by rigorous scientific research, placing us in the top tier of speech apps worldwide for our effectiveness and engagement. Explore the research behind Speech Blubs and our methodology.
We believe in making speech development an exciting adventure, not a chore. Many parents have seen incredible progress and renewed joy in their children's communication journey thanks to Speech Blubs. Read testimonials from other families who have experienced the difference.
Ready to empower your child's communication journey? Download Speech Blubs on the App Store or Google Play today!
The Speech Blubs Difference: Value and Plans
We offer flexible subscription plans designed to fit your family's needs, but for the most comprehensive experience and outstanding value, we highly recommend our Yearly plan.
Our Monthly plan is available at $14.99 per month.
However, our Yearly plan is the clear best choice, priced at just $59.99 per year. This breaks down to an incredible $4.99 per month, allowing you to save 66% compared to the monthly subscription!
The Yearly plan doesn't just offer superior savings; it also includes exclusive, high-value features that enhance your child's learning experience:
- A 7-day free trial: Experience the full power of Speech Blubs completely free before committing.
- The extra Reading Blubs app: Foster early literacy skills alongside speech development with this valuable bonus app.
- Early access to new updates: Be the first to try out our latest features and content.
- Priority 24-hour support response time: Get your questions answered quickly and efficiently.
Please note that the Monthly plan does not include these additional benefits.
To unlock all these features and provide your child with the best possible start on their speaking journey, we encourage you to create your account and begin your 7-day free trial today by selecting our Yearly plan. Discover more about how Speech Blubs supports joyful learning and empowers children's voices.
Conclusion
Easy snowflake crafts for kids offer a magical way to embrace the winter season, filling your home with beautiful decorations and, more importantly, nurturing your child's development. These hands-on activities are not just about cutting and gluing; they are rich opportunities for enhancing fine motor skills, sparking creativity, boosting cognitive abilities, and building crucial language and communication skills. Each snip, fold, and bead placed is a chance to engage in meaningful conversation, expand vocabulary, and foster a love for expressing thoughts and ideas.
By actively participating alongside your child, asking open-ended questions, and describing the process, you create a nurturing environment where communication flourishes. And for those moments when your child could benefit from targeted, joyful speech practice, Speech Blubs is here to support you. Our app, built on scientific video modeling and designed by founders who personally understand speech challenges, provides "smart screen time" that complements hands-on learning, empowering children to confidently "speak their minds and hearts."
So, gather your materials, embrace the wonder of winter, and start crafting. And why wait to empower your child's voice even further? Start your 7-day free trial today by choosing our Yearly plan – the smartest choice for your child’s speaking journey. Let's make this winter a season of creativity, connection, and confident communication!
Frequently Asked Questions (FAQ)
Q1: What are the easiest snowflake crafts for toddlers?
A1: For toddlers, the easiest crafts involve simple actions and large materials. Cotton ball snowflakes (painting glue and sticking cotton), dot sticker snowflakes, and pre-cut shape collages are excellent choices as they focus on sensory exploration, pincer grasp, and basic sticking without complex cutting.
Q2: How can I make paper snowflakes without them ripping?
A2: To prevent paper snowflakes from ripping, use paper that isn't too thin (standard copy paper is usually fine, but avoid very flimsy tissue paper for beginners). Most importantly, use sharp scissors for clean cuts and unfold the finished snowflake very gently and slowly. If you want a more delicate look but worry about ripping, coffee filter snowflakes are a great alternative because the material is easier to cut and less prone to tearing during unfolding.
Q3: Besides paper, what other materials can I use for snowflake crafts?
A3: There are many creative alternatives to paper! You can use pipe cleaners and beads, popsicle sticks (painted, glittered, or decorated), cotton balls, salt painting with glue and watercolors, coffee filters, craft foam, or even recycled materials like cardboard or paper towel tubes. These offer different textures and challenges.
Q4: How do these crafts help with speech development?
A4: Snowflake crafts naturally boost speech development by creating opportunities for conversation. Children learn new vocabulary (e.g., "sparkly," "sticky," "fold," "cut," "symmetrical," "point"), practice following multi-step directions, and engage in descriptive language ("This snowflake is big and blue!"). They also develop confidence in expressing their ideas and asking questions about the craft, all within a fun and low-pressure environment.
About the author