Festive Christmas Crafts: Kids' Joyful Creations
 By Speech Blubs Team•Dec 22, 2025•
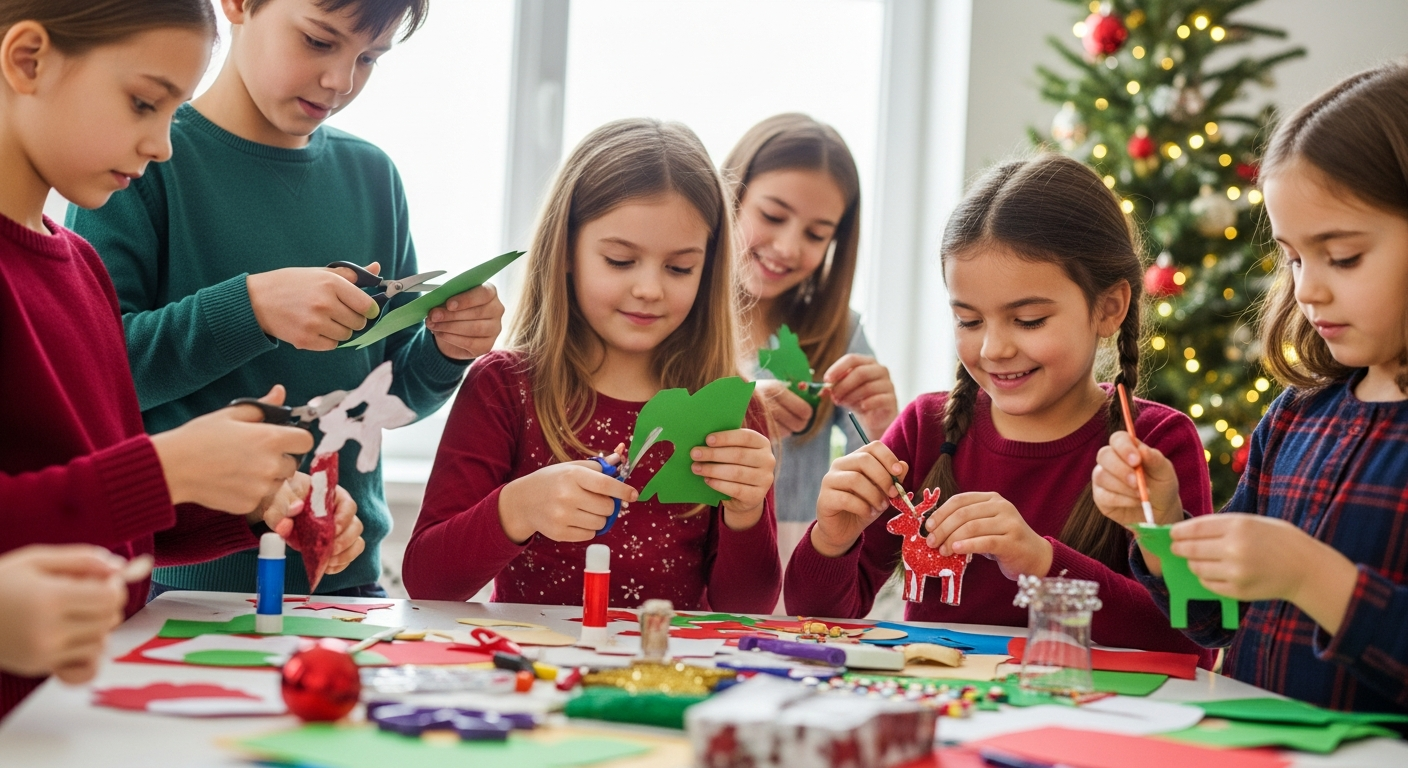
Table of Contents
- Introduction to the Magic of Making
- The Developmental Superpowers of Christmas Crafts
- Festive Christmas Crafts for Kids: A Project-by-Project Guide
- Beyond the Craft: Nurturing Communication with Speech Blubs
- Conclusion: Crafting Joy, Building Futures
- Frequently Asked Questions
The holiday season often feels like a whirlwind of activity, from bustling shopping trips to endless party planning. Amidst the flurry, it’s easy to overlook the simple, profound joy of creating something beautiful with our children. Imagine the sparkle in their eyes as they proudly display a handmade ornament, or the warm feeling of connection as you work side-by-side, crafting memories that will last far beyond the festive lights. These moments aren't just about making decorations; they're about fostering creativity, honing essential developmental skills, and strengthening family bonds.
This blog post is your ultimate guide to transforming ordinary afternoons into extraordinary holiday adventures. We’ll dive into a treasure trove of festive Christmas crafts designed specifically for kids, offering engaging activities that are fun, educational, and easy to achieve. From whimsical ornaments to heartfelt gifts, these projects will not only deck your halls with charm but also provide invaluable opportunities for skill development and meaningful interaction. Get ready to embrace the magic of making and discover how these creative endeavors can enrich your child's growth and your family's holiday spirit.
Introduction to the Magic of Making
The holiday season is synonymous with warmth, togetherness, and, for many, the delightful chaos of children's boundless energy. But what if we could channel that energy into something truly special and developmentally enriching? Enter Christmas crafts for kids! These aren't just mere pastimes; they are powerful vehicles for learning, self-expression, and connection.
Think about it: when a child crafts, they're not just gluing glitter onto paper. They're developing fine motor skills crucial for writing and self-care, learning to follow instructions, making creative choices, and even engaging in early problem-solving. Beyond the tangible output, there's an immense emotional benefit. The pride of creating something unique, the joy of gifting a handmade item, and the confidence gained from seeing a project through from start to finish are invaluable. These experiences help children learn to "speak their minds and hearts" through their actions, a mission we deeply cherish at Speech Blubs.
In this comprehensive guide, we'll explore a variety of engaging Christmas craft ideas suitable for different ages and skill levels. We'll provide step-by-step instructions, suggest creative variations, and highlight the developmental advantages of each activity. We'll also touch upon how these hands-on activities, combined with purposeful communication, lay a fantastic foundation for language development. Just as we at Speech Blubs believe in turning screen time into "smart screen time" with our award-winning app, we encourage you to view craft time as "smart play time" – a screen-free alternative that encourages interaction and growth. So, gather your supplies, put on some festive tunes, and prepare to embark on a season of joyful, creative making with your little ones!
The Developmental Superpowers of Christmas Crafts
Before we dive into the specific craft ideas, let's explore why these simple activities are so incredibly beneficial for children's growth and development. Far beyond mere entertainment, crafting stimulates multiple areas of a child's brain and body.
Fine Motor Skill Development
Every snip of the scissors, every squeeze of the glue bottle, every delicate placement of a sequin is a workout for tiny hands and fingers. These repetitive, precise movements strengthen the small muscles in the hands and wrists, improving dexterity and coordination. These are the foundational skills needed for tasks like writing, buttoning clothes, tying shoelaces, and even holding a spoon correctly. The more practice children get with fine motor activities, the more proficient they become.
Cognitive Growth and Problem-Solving
Crafting isn't just about following directions; it's about thinking! Children learn to plan, sequence steps, and make decisions ("Which color should I use here?"). If a step goes awry, they learn to problem-solve and adapt. "How can I fix this?" becomes a natural question, fostering resilience and flexible thinking. They also practice memory by recalling instructions and spatial reasoning as they arrange elements.
Language and Communication Skills
This is where crafting truly shines as a partner to speech and language development. As children craft, they naturally engage in communication:
- Vocabulary Expansion: Naming colors, shapes, textures (fuzzy, bumpy, smooth), actions (cut, glue, paint, fold), and materials.
- Descriptive Language: Encouraging children to describe their creations, the steps they're taking, or how they feel about their artwork. "Tell me about your sparkling snowflake!"
- Following Instructions: Listening to and understanding multi-step directions.
- Asking and Answering Questions: "What comes next?", "Can you pass the glitter?", "Why did you choose red?"
- Narration and Storytelling: Imagining stories about their creations (e.g., a pinecone elf's adventure).
For children who might need extra support in these areas, everyday activities like crafting provide a fantastic, low-pressure environment for practice. Paired with resources like Speech Blubs, which offers engaging activities based on video modeling to teach complex communication skills, these moments become even more impactful. Our app empowers children to learn by watching and imitating their peers, fostering communication in a joyful, effective way. If you’re curious about your child’s speech development, why not take our quick 3-minute preliminary screener? It provides a simple assessment and a next-steps plan, and even includes a free 7-day trial of our app.
Emotional and Social Development
The pride of accomplishment is immense when a child finishes a craft. This boosts self-esteem and confidence. When crafting with others, they learn to share materials, take turns, and offer compliments, nurturing social skills. Crafting can also be a wonderful outlet for self-expression, allowing children to communicate feelings and ideas non-verbally.
Creativity and Imagination
There are no strict rules in crafting. Children are encouraged to experiment, innovate, and let their imaginations soar. This fosters original thinking and helps them see possibilities beyond the obvious.
Festive Christmas Crafts for Kids: A Project-by-Project Guide
Let's get crafting! Here are some of our favorite Christmas craft ideas, detailed with materials, instructions, variations, and specific developmental benefits.
1. Salt Dough Ornaments: Timeless Keepsakes
Salt dough ornaments are a classic for a reason – they're simple, versatile, and create beautiful, lasting keepsakes.
Materials Needed:
- 1 cup all-purpose flour
- ½ cup salt
- ½ cup water (add gradually)
- Mixing bowl
- Rolling pin
- Christmas cookie cutters
- Drinking straw (for making holes)
- Baking sheet and parchment paper
- Acrylic paints, glitter, paintbrushes
- Ribbon or string
Step-by-Step Instructions:
- Mix the Dough: In a large bowl, combine the flour and salt. Gradually add water, mixing until a firm, pliable dough forms. You might need a little more or less water. Knead for 5-10 minutes until smooth.
- Roll and Cut: Roll out the dough on a lightly floured surface to about ¼ inch thickness. Use cookie cutters to cut out festive shapes like stars, trees, gingerbread men, and angels.
- Make Hanging Holes: Use a straw to poke a hole near the top of each ornament. Make sure the hole is large enough for a ribbon.
- Bake: Carefully transfer the ornaments to a parchment-lined baking sheet. Bake in a preheated oven at 250°F (120°C) for 2-3 hours, or until completely hardened. Baking time will vary depending on thickness. You can also air-dry them for 24-72 hours, flipping occasionally.
- Cool and Decorate: Once cooled, let the decorating fun begin! Use acrylic paints, glitter, markers, or even glue on small beads or sequins. Encourage descriptive language – "What colors are you using? How does the glitter feel?"
- Add Ribbon: Thread a ribbon or string through the hole for hanging.
Variations and Extensions:
- Handprint/Footprint Ornaments: Press a child's hand or foot into the dough before baking for a truly personalized keepsake. These make wonderful gifts for grandparents.
- Scented Dough: Add a teaspoon of cinnamon, nutmeg, or pumpkin pie spice to the dough mix for fragrant ornaments.
- Glitter Dough: Mix fine glitter directly into the dough before rolling.
Developmental Benefits:
- Sensory Exploration: The tactile experience of kneading the dough is calming and engaging. Discuss textures: "Is it smooth or bumpy?"
- Fine Motor Skills: Rolling, cutting, poking holes, and painting all refine hand-eye coordination and dexterity.
- Following Multi-Step Instructions: Children learn sequencing and patience as they follow the recipe and crafting steps.
- Descriptive Language: Naming colors, shapes, actions ("knead," "roll," "cut," "paint"), and discussing textures and smells. This is a perfect opportunity for expanding vocabulary.
2. Pinecone Critters & Decorations: Nature's Craft Box
Bring the outdoors in with beautiful pinecone crafts. They are wonderfully tactile and offer endless possibilities.
Materials Needed:
- Pinecones (collected and cleaned)
- Googly eyes
- Felt scraps (various colors)
- Small pom-poms
- Pipe cleaners
- Craft glue or hot glue gun (adult supervision required)
- Glitter, sequins (optional)
- Small bells (optional)
Step-by-Step Instructions:
- Collect and Clean: Go on a nature walk to find pinecones. Bake them on a foil-lined tray at 200°F (90°C) for about 30 minutes to kill any bugs and help them open up.
- Choose Your Critter/Decoration: Decide if you want to make a reindeer, an owl, a festive tree, or a simple glittery ornament.
- Assemble:
- Reindeer: Glue googly eyes near the top. Cut ear shapes from felt and glue them on. Bend pipe cleaners for antlers and glue them to the top. Add a small red pom-pom for a nose.
- Owl: Glue two large googly eyes. Cut felt circles for wings and glue them to the sides. Cut a small felt triangle for a beak.
- Festive Tree: Simply add small pom-poms, sequins, or a touch of glitter to the pinecone's "branches" to make it look like a mini Christmas tree.
- Dry: Allow the glue to dry completely.
Variations and Extensions:
- Hanging Ornaments: Attach a loop of string or ribbon to the top of pinecone crafts to hang on the tree.
- Pinecone Gnomes: Add a felt hat and a wooden bead head for an adorable gnome.
- Winter Wonderland Scene: Create a diorama with several pinecone creatures, cotton ball snow, and small twigs.
Developmental Benefits:
- Nature Exploration: Encourages observation and appreciation for natural materials.
- Problem-Solving: Figuring out how to attach different materials to the bumpy surface of a pinecone. "How can we make these antlers stick?"
- Imaginative Play: Creating characters fosters storytelling and imaginative scenarios.
- Vocabulary: Naming animals, body parts, colors, and textures ("spiky," "soft," "smooth").
3. DIY Snow Globes: A Winter Wonderland in a Jar
Capture the magic of a snowy day in a personalized snow globe.
Materials Needed:
- Small, clean glass jars with tight-fitting lids (e.g., jam jars, baby food jars)
- Small waterproof plastic figurines or ornaments (mini trees, Santa, reindeer, snowmen)
- Waterproof glue (e.g., super glue, hot glue – adult supervision)
- Distilled water
- Glycerin (available at pharmacies; helps glitter float)
- Glitter (fine glitter works best)
- Optional: Small pebbles or sand for the base
Step-by-Step Instructions:
- Glue Figures to Lid: Apply waterproof glue to the inside of the jar lid. Securely glue your chosen figurines to the lid, making sure they fit inside the jar when the lid is closed. Let dry completely (at least an hour, or overnight for best results).
- Fill the Jar: Fill the jar almost to the top with distilled water.
- Add Glycerin: Add 1-2 teaspoons of glycerin. This makes the glitter fall slowly. Experiment with how much you add.
- Add Glitter: Sprinkle in 1-2 teaspoons of glitter. You can mix colors! "What happens when we add the glitter? Does it sink or float?"
- Seal the Globe: Once the glue on your figurines is completely dry, screw the lid onto the jar very tightly. You can add extra waterproof glue around the rim of the lid before screwing it on for a permanent seal (adult step).
- Shake and Enjoy: Turn your snow globe upside down, shake it gently, and watch the magic unfold!
Variations and Extensions:
- Themed Globes: Create a globe for each family member or based on a favorite Christmas story.
- Colored Water: Add a tiny drop of food coloring to the water for a unique look.
Developmental Benefits:
- Cause and Effect: Observing how glycerin affects the glitter's fall.
- Sensory Input: The visual and tactile experience of shaking and watching the glitter.
- Imaginative Storytelling: Encouraging children to create stories about the characters in their snow globe.
- Vocabulary: Words related to winter, weather, actions (shake, pour, float, sink), and descriptive terms.
4. Paper Plate Characters: Jolly Faces for the Season
Paper plates are incredibly versatile for simple, engaging crafts.
Materials Needed:
- Paper plates
- Washable paints (red, green, white, brown)
- Construction paper (various colors)
- Cotton balls
- Googly eyes
- Craft glue
- Scissors (child-safe)
- Markers
Step-by-Step Instructions:
- Choose Your Character: Decide if you want to make Santa, a reindeer, a snowman, or an elf.
- Paint the Plate:
- Santa: Paint the top half of the plate red for the hat, leave the middle for the face, and glue cotton balls along the bottom for the beard.
- Reindeer: Paint the entire plate brown.
- Snowman: Paint the entire plate white.
- Cut and Assemble Features:
- Santa: Cut a red triangle for a hat, glue a cotton ball on top and along the brim. Add googly eyes and a red pom-pom nose. Glue cotton balls for a beard.
- Reindeer: Glue googly eyes. Cut a red circle for a nose (Rudolph!). Cut antler shapes from brown construction paper and glue to the top.
- Snowman: Glue googly eyes, an orange triangle for a carrot nose, and draw a smile with a marker. Add black construction paper circles for buttons.
- Dry: Let all the glue and paint dry completely.
Variations and Extensions:
- Wreath: Cut out the center of a paper plate, paint the ring green, and decorate with pom-poms and glitter to make a simple wreath.
- Masks: Add elastic string to the sides to turn characters into wearable masks.
Developmental Benefits:
- Color Recognition and Shape Identification: Naming and using different colors and shapes (circles, triangles).
- Cutting Skills: Practicing scissor skills to cut out paper features.
- Facial Feature Vocabulary: Identifying and naming eyes, nose, mouth, ears, and expressing different emotions these faces might show.
- Creativity: Designing their own unique character, fostering imaginative play and self-expression.
5. Handprint/Footprint Art: Personalized Memories
These crafts create cherished memories and personal keepsakes.
Materials Needed:
- Washable craft paint (red, green, white, brown)
- Thick paper or cardstock
- Paintbrushes
- Markers or pens
- Optional: Glitter, ribbon
Step-by-Step Instructions:
- Prepare the Paint: Pour a small amount of paint onto a flat plate or paper.
- Create the Print:
- Reindeer Antlers (Handprint): Paint your child's hand brown. Press it firmly onto the paper with fingers spread, ensuring the palm is at the bottom. Once dry, turn the paper upside down. Draw a reindeer face (eyes, nose, mouth) where the palm would be. Add a red thumbprint for Rudolph's nose!
- Santa (Footprint): Paint your child's foot white. Press it onto the paper. Once dry, draw Santa's face and hat where the heel is, and add a red hat, googly eyes, and a pom-pom. The toes become Santa's beard!
- Christmas Tree (Multiple Handprints): Use green paint. Press multiple green handprints overlapping to form a tree shape. Decorate with painted "ornaments" or glitter.
- Decorate and Personalize: Once dry, add details with markers, glitter, or small stickers. Write the child's name and the year on the back.
Variations and Extensions:
- Keepsake Ornaments: Use salt dough (as described above) for handprint or footprint ornaments that can be hung on the tree.
- Greeting Cards: Make handprint art on the front of folded cardstock for a personalized Christmas card.
Developmental Benefits:
- Body Awareness: Children become more aware of their hands and feet as they paint and press them.
- Sensory Experience: The feeling of paint on their skin. "How does the paint feel on your hand?"
- Direction Following: Listening to instructions like "spread your fingers," "press firmly."
- Personal Connection: Creates a special bond through shared creation and a tangible memory. Great for discussing family and love.
6. Yarn-Wrapped Ornaments: Texture and Color Fun
This craft is fantastic for developing fine motor control and exploring textures.
Materials Needed:
- Cardboard scraps (from cereal boxes, etc.)
- Scissors (adult for cardboard)
- Yarn in various Christmas colors (red, green, white, gold, silver)
- Craft glue
- Optional: Beads, buttons, small jingle bells
Step-by-Step Instructions:
- Cut Cardboard Shapes: Adults can cut festive shapes (stars, circles, trees, hearts) from cardboard. Keep them simple for easy wrapping.
- Secure Starting Yarn: Put a dab of glue on the back of the cardboard shape and press the end of a yarn strand onto it. Let it dry slightly.
- Wrap the Yarn: Guide your child to wrap the yarn tightly around the cardboard shape, covering it completely. They can wrap in one direction or crisscross for a textured look. Encourage them to change colors for stripes or patterns. "What color are you using now? How many times have you wrapped it?"
- Secure End: Once the shape is fully covered, glue the end of the yarn to the back of the ornament.
- Add Embellishments: Glue on beads, buttons, or jingle bells for extra sparkle and sound.
- Add Hanger: Loop a piece of yarn or string through a top section of the wrapped ornament for hanging.
Variations and Extensions:
- Yarn-Wrapped Letters: Wrap yarn around cardboard letters to spell out "JOY" or "NOEL."
- Stick Tree: Find a small twig, wrap it with green yarn, and decorate it to make a mini Christmas tree.
Developmental Benefits:
- Fine Motor Control: The intricate wrapping motions strengthen finger muscles and improve precision.
- Color Sorting and Pattern Recognition: Choosing and arranging different colors of yarn.
- Counting and Sequencing: Counting how many times they wrap or following a color pattern.
- Sensory Input: Exploring the texture of yarn. "Is the yarn soft or rough?"
7. Popsicle Stick Picture Frames: Capturing Christmas Joy
Turn simple popsicle sticks into charming frames for holiday photos.
Materials Needed:
- Popsicle sticks (regular or jumbo)
- Craft glue
- Washable paints, markers, or glitter
- Small festive decorations (buttons, sequins, small pom-poms)
- Small photos (or drawn pictures)
- Magnets or string for hanging
Step-by-Step Instructions:
- Build the Frame: Arrange four popsicle sticks into a square or rectangular frame. Glue the ends where they overlap. You might need to hold them for a moment or use clothespins to help them dry.
- Decorate the Frame: Once the glue is dry, let your child paint the frame, draw patterns with markers, or glue on glitter, sequins, and small festive shapes. "What does your frame remind you of?"
- Add a Photo: Glue a small photo or a child's drawing onto the back of the frame, ensuring it shows through the opening.
- Add Hanger or Magnet: Glue a loop of string to the back for hanging, or attach a small magnet to turn it into a fridge decoration.
Variations and Extensions:
- Popsicle Stick Snowflakes: Arrange sticks into a starburst pattern, glue, and decorate.
- Popsicle Stick Christmas Trees: Arrange sticks into a triangle shape for a tree, paint green, and decorate.
Developmental Benefits:
- Spatial Reasoning: Arranging sticks to form shapes and understanding how they fit together.
- Geometry: Learning about squares, rectangles, and triangles.
- Discussing Memories: Choosing photos to frame and talking about the people and events in them.
- Naming Family Members: Identifying people in the photos and expressing affection.
8. DIY Christmas Cards: Spreading Holiday Cheer
Making personalized cards is a wonderful way to teach children about expressing love and gratitude.
Materials Needed:
- Construction paper or cardstock (various colors)
- Markers, crayons, colored pencils
- Stickers, glitter, craft punches
- Craft glue
- Scissors (child-safe)
- Optional: Stamps, ink pads
Step-by-Step Instructions:
- Fold the Card: Fold a piece of cardstock in half to create a card base.
- Decorate the Front: Let your child unleash their creativity! They can draw festive scenes (Santa, snowmen, trees), use stickers, glue on glitter, or create a collage of cut-out shapes. "What Christmas picture do you want to draw?"
- Write a Message: Help your child write a personal message inside. For younger children, they can dictate a message for you to write, or simply draw a picture and sign their name. "What do you want to tell Grandma?"
- Personalize: Add their name and the year.
Variations and Extensions:
- Pop-Up Cards: Create simple pop-up elements inside the card (e.g., a popped-up Santa or tree).
- Fingerprint Characters: Use washable ink pads or paint to create fingerprint characters (e.g., Santa's face with a red hat, reindeers with antlers drawn on).
Developmental Benefits:
- Pre-Writing/Writing Skills: Holding writing tools, forming letters, and practicing their name.
- Expressing Emotions: Learning to articulate feelings of love, joy, and gratitude.
- Social Communication: Understanding the purpose of greeting cards and how they connect people.
- Fine Motor Skills: Drawing, cutting, and gluing all contribute to dexterity.
9. Reindeer Food: A Magical Christmas Eve Tradition
This simple craft sparks imagination and adds a touch of magic to Christmas Eve.
Materials Needed:
- Rolled oats
- Edible glitter (food-grade)
- Festive sprinkles (red, green)
- Small clear plastic bags or festive treat bags
- Ribbon or twist ties
- Printable labels (optional)
Step-by-Step Instructions:
- Mix Ingredients: In a bowl, combine a generous amount of rolled oats with a spoonful or two of edible glitter and festive sprinkles. Encourage your child to mix thoroughly. "What colors do you see in the sprinkles?"
- Bag the Food: Spoon the reindeer food into individual small bags.
- Seal and Decorate: Seal the bags with ribbon or twist ties. If using, attach a label with a fun poem: "Sprinkle on the lawn tonight / So reindeer can take flight!"
- Christmas Eve Magic: On Christmas Eve, head outside and sprinkle the magical reindeer food on the lawn to help guide Santa's sleigh.
Variations and Extensions:
- Birdseed Mix: Create a version with birdseed, oats, and dried fruit for local birds to enjoy.
- Magic Dust: Use different colors of glitter and call it "Elf Dust" or "Fairy Dust" for year-round imaginative play.
Developmental Benefits:
- Following Recipes: Simple measuring and mixing.
- Imaginative Play: Fueling belief in Santa and his reindeer, fostering creative storytelling.
- Sequencing: Understanding the order of steps in a simple "recipe."
- Sensory Play: The tactile experience of scooping and mixing.
10. Q-Tip Snowflakes & Winter Scenes: Detail-Oriented Art
This craft is excellent for developing fine motor control and creating delicate patterns.
Materials Needed:
- Cotton swabs (Q-tips)
- White craft paint
- Dark blue or black construction paper
- Small plate or palette for paint
- Optional: Glitter glue
Step-by-Step Instructions:
- Prepare Paint: Squeeze a small amount of white paint onto a plate.
- Dip and Dot: Show your child how to dip the end of a Q-tip into the paint and then press it onto the dark paper to create dots.
- Create Snowflakes: Guide them to create snowflake patterns by arranging dots in radial symmetry (like spokes on a wheel). They can make simple crosses, or more complex starburst shapes. "How many points does your snowflake have?"
- Create Winter Scenes: Beyond snowflakes, they can use Q-tips to create falling snow, snowman dots, or little frosted trees.
- Dry and Embellish: Let the paint dry completely. Add a touch of glitter glue for extra sparkle.
Variations and Extensions:
- Colored Q-Tip Painting: Use different colored paints on various paper backgrounds to create abstract art or other themed scenes.
- Pointillism: Introduce the concept of pointillism by creating entire pictures using only dots.
Developmental Benefits:
- Fine Motor Control: The precise movement required to use a Q-tip for dotting is excellent for finger dexterity.
- Pattern Creation: Understanding and replicating patterns for snowflakes.
- Concentration: Focus required for detailed work.
- Descriptive Language: Describing patterns, shapes, and the "cold" feeling of snow.
Beyond the Craft: Nurturing Communication with Speech Blubs
While these Christmas crafts provide a wonderful foundation for development and family connection, sometimes children need an extra boost to truly speak their minds and hearts. That's where Speech Blubs comes in. Our app was born from the personal experiences of our founders, who grew up with speech problems and created the tool they wished they had—an immediate, effective, and joyful solution for the 1 in 4 children who need speech support.
We blend scientific principles with play, creating one-of-a-kind "smart screen time" experiences. Our unique video modeling methodology, where children learn by watching and imitating their peers, is backed by research and has earned us a top-tier MARS scale rating. This method is a powerful screen-free alternative to passive viewing, promoting active engagement and family connection. You can read testimonials from other parents who have seen incredible progress, or explore the science behind our method to understand why it’s so effective.
Making the Most of Your Speech Blubs Experience: Our Value
We believe in making our transformative tool accessible and transparent. Here’s a breakdown of our plans:
- Monthly Plan: For $14.99 per month, you get access to our core speech therapy exercises and games.
- Yearly Plan: This is our best value, costing just $59.99 per year, which breaks down to an incredible $4.99 per month. That's a 66% savings compared to the monthly plan!
Choosing the Yearly plan isn't just about saving money; it unlocks a richer experience with exclusive, high-value features designed to maximize your child's progress:
- 7-Day Free Trial: Only the Yearly plan includes a full 7-day free trial, allowing you and your child to explore all the features risk-free.
- Reading Blubs App: Get complimentary access to our additional Reading Blubs app, further supporting your child's literacy journey.
- Early Access & Priority Support: Enjoy early access to new updates and features, plus 24-hour response time for customer support, ensuring you always have the help you need.
The Monthly plan does not include these fantastic benefits. We encourage you to choose the Yearly plan to get the free trial and the full suite of features that support your child's speech and language development journey comprehensively. Ready to start? You can download Speech Blubs on the App Store or get Speech Blubs on Google Play today!
Conclusion: Crafting Joy, Building Futures
The Christmas season is a precious time for creating cherished memories, and there's no better way to do so than by engaging in festive crafts with your children. From the simple joy of shaping salt dough ornaments to the imaginative magic of creating reindeer food, each project offers a unique opportunity for fun, learning, and connection. These hands-on activities are not just about pretty decorations; they are powerful tools for developing crucial fine motor skills, fostering cognitive growth, expanding vocabulary, and nurturing emotional intelligence.
By setting aside time to craft together, you're investing in more than just holiday cheer; you're building a foundation for lifelong learning and strengthening the bonds that tie your family together. These moments of shared creation naturally encourage communication, descriptive language, and problem-solving, helping your child to articulate their thoughts and feelings more effectively.
And for those times when your child might need a little extra support on their communication journey, remember that Speech Blubs is here to help. Our app complements these wonderful screen-free activities by offering a joyful, effective, and scientifically backed approach to speech and language development. We empower children to "speak their minds and hearts" through engaging video modeling, transforming screen time into "smart screen time" that sparks communication.
This holiday season, embrace the magic of making. Create, connect, and celebrate the incredible growth happening right before your eyes.
Ready to give your child the gift of confident communication? Start your free 7-day trial today by choosing the Yearly plan for the best value and access to all our premium features, including the Reading Blubs app and priority support! Download Speech Blubs on the App Store or download Speech Blubs on Google Play and unlock a world of expressive possibilities for your child.
Frequently Asked Questions
Q1: What age group are these Christmas crafts suitable for?
A1: Many of these crafts are adaptable for a wide range of ages. Younger children (toddlers and preschoolers) will enjoy the sensory aspects and simple steps like painting, gluing, and mixing with adult supervision and assistance. Older children (school-aged) can handle more intricate steps like cutting, detailed decorating, and following multi-step instructions independently, often adding their own creative twists. We always recommend adult involvement to ensure safety and enhance the learning experience.
Q2: What are the main benefits of doing Christmas crafts with my child?
A2: Christmas crafts offer a wealth of benefits! They significantly boost fine motor skills (crucial for writing), enhance cognitive abilities like problem-solving and sequencing, and expand language and communication through naming, describing, and discussing. Beyond skills, they foster creativity, imagination, self-esteem, and provide wonderful opportunities for family bonding and creating lasting memories.
Q3: How can I make these crafts more language-rich for my child?
A3: To maximize language development, actively engage your child in conversation throughout the crafting process. Ask open-ended questions ("What do you think will happen next?", "How does that feel?", "Tell me about your green Christmas tree!"). Narrate your own actions ("Now I'm cutting the paper"), describe materials (e.g., "This glitter is so sparkly!"), and encourage your child to give you instructions. Focus on using descriptive words and expanding their vocabulary. For targeted speech support, consider supplementing with tools like Speech Blubs, which uses video modeling to encourage imitation and practice.
Q4: How much does Speech Blubs cost, and what's included?
A4: Speech Blubs offers two main plans. The Monthly plan is $14.99/month. Our best value is the Yearly plan, which costs $59.99/year (just $4.99/month, a 66% savings). The Yearly plan includes a 7-day free trial, access to our Reading Blubs app, early access to new features, and 24-hour priority customer support. The Monthly plan does not include these additional benefits. We highly recommend the Yearly plan for the most comprehensive and valuable experience.