No-Sew Kids Face Mask Ideas Made from Household Items
In deciding what your next DIY projects will be, considering making your own protective face masks like the medical masks doctors wear.
In This Article:
- How To Find The Right Fit
- Bonus Tip: Work on Language Skills while Making a Face Mask
- 3 No-sew Face Masks that You Can Make with Your Kids
- 1. No-sew Bandana Face Mask
- 2. No-sew Old T-shirt Face Mask
- 3. No-sew Flat Sheet Face Mask
- Use a Face Mask to Protect Your Child
With the widespread pandemic topping 1 million worldwide, the Center for Disease Control (CDC) in the United States is recommending face masks for anyone over the age of two years old. In this article, we will show you three simple ways on how to do a DIY face mask with your child.
Face masks need to be worn regardless of whether an individual is showing symptoms or not. This is in hopes of dramatically slowing the virus and ending the pandemic.
Even more, face masks are in short supply and are not found in stores to buy. This has everyone turning to create face masks from everyday household items.
Wear Masks, People!
Although we are all social distancing and self-quarantining, we still need to wear masks when we leave our homes. This includes face masks for children over the age of two! To help protect your children outside the home, start creating face masks from things found in your home.
No-sew children’s face masks are an easy and time-saving option for any parent who can’t find store-bought masks. Here are three no-sew ideas for children’s masks made from simple household items.
How to Find the Right Fit
To begin, children are constantly growing and require different sizing for face masks compared to adults. So, to find the perfect fit for a child’s homemade no-sew face mask the following criteria need to apply:
- The mask should be secured with elastic bands behind the ears or with ties behind the head
- Use more than one layer of fabric
- Make sure it’s breathable
- Is machine-washable
- Use material that will not change shape after being laundered
These criteria points will ensure your child’s face around the chin, cheeks, and nose is fully covered with fabric.
Bonus Tip: Work on Language Skills while Making a Face Mask
Speech Blubs App includes a "This is My Body" section, that will help your child improve their knowledge of the body parts. Talk about them while making the mask, let them point them out to you. Make sure you use the vocabulary they learned in the app in a real-life situation like DIY-ing your face mask.
3 No-sew Face Masks that You Can Make with Your Kids
1. No-sew Bandana Face Mask
This DIY children’s face mask is by far the easiest of the three patterns. By using a specific folding technique you create multiple layers of fabric to this face mask. All this pattern requires is a bandana or handkerchief and two hair ties. To make this easy children’s DIY face mask, following the steps below!
1. Lay bandana flat on a table
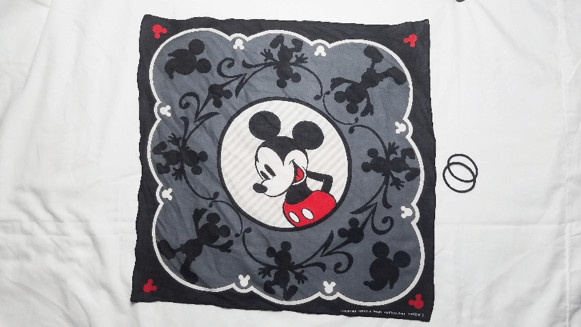
2. Find the center of the bandana and fold the top half of the bandana to the center
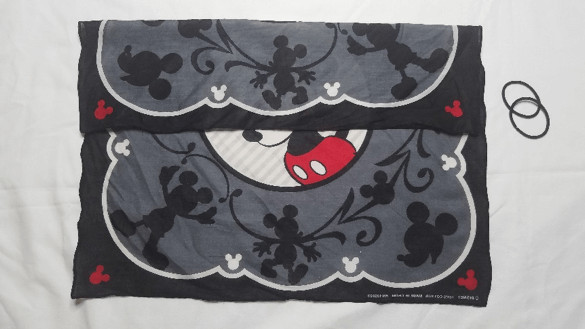
3. Repeat this step by folding the bottom half to the center
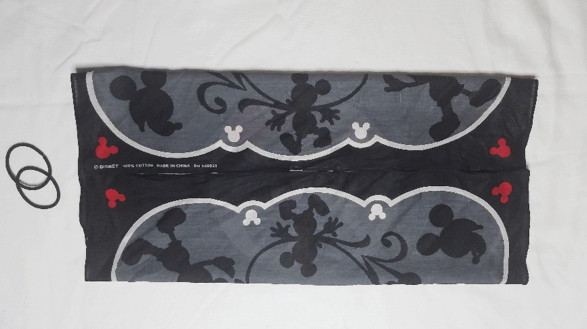
4. Flip the folded bandana over
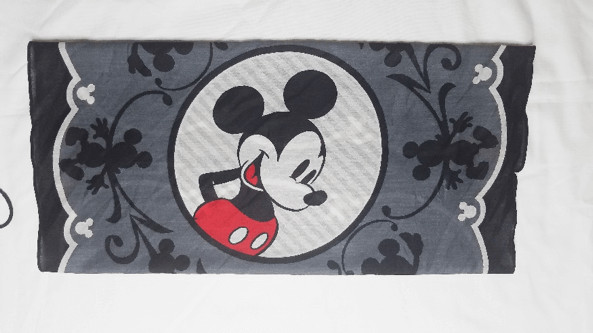
5. Repeat the above process over again (find the center; bring top and bottom half to the center)
6. Flip the bandana over again
7. Thread each end of the bandana with the hair ties and evenly space them apart.
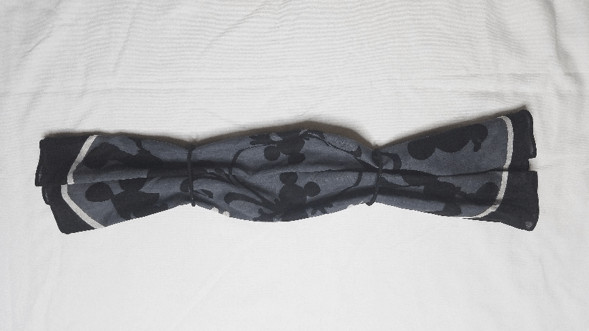
8. Fold the ends of the bandana into the center again
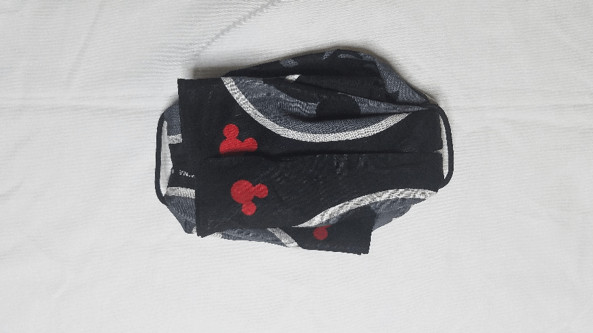
9. Flip the bandana over again to and use the hair ties to stretch over the ears and place over the nose, mouth, and chin.
This no-sew bandana face mask creates a perfect pleated multi-layer mask that’s still breathable. It is designed to unfold easily and throw in the washer after every use. (Face mask design curtesy of Japanese Creations).
2. No-sew Old T-shirt Face Mask
This no-sew method is perfect for any parent because children outgrow clothing so fast, you probably have an old t-shirt lying around somewhere. It’s an easy pattern requiring minimal effort. For this DIY face mask, you only need two items, an old t-shirt and a pair of scissors.
To make this no-sew t-shirt face mask, find an old t-shirt your child no longer fits into. Then, cut less than half of the bottom portion of the t-shirt. The CDC recommends 7 to 8 inches be cut from the bottom of a t-shirt. However, the instructions from the CDC are directions for an adult, not a child. This measurement may be shorter than 7 inches if you’re using your child’s shirt.
Don’t Throw Out Those Old T-Shirts!
How to create a t-shirt face mask:
- Lay an old t-shirt flat on a table
- Use scissors to cut off 7 or fewer inches to the bottom of the shirt
- Cut a rectangle in one enclosed side of the fabric
- Leave a quarter inch from the edge and the rectangle of the shirt
- With the cutout rectangle missing, cut the ends to make two strings into four ties to secure around the head and neck
https://www.youtube.com/watch?v=x_HgS61y9BY
Of all the no-sew patterns available, this is the easiest to make and possibly the most comfortable because of its lightweight design. The best part about a t-shirt face mask is that you can make as many as you want from an old t-shirt and wash them after each use.
A benefit of using a t-shirt for a children’s face mask is that (depending on the shirt) your child can wear fashionable designs on their face mask. An old Mickey Mouse t-shirt now becomes a fashionable Mickey Mouse face mask! This could lower a child’s anxiety about wearing a face mask and may make it easier to get them to wear a mask.
3. No-sew Flat Sheet Face Mask
While this method requires more materials, this no-sew face mask idea gives your child a large number of face masks. If a queen-sized flat bed sheet is cut correctly you may get up to 24 face masks per sheet! Plus, this pattern allows for a makeshift nose piece for the mask to fit snuggly on your child’s face.
For this project you will need the following materials:
- One queen size flat bed sheet
- Measuring tape
- Large paper clips or pipe cleaners
- Safety pins or stapler
- Scissors
Repurpose Old Bed Sheets
To complete this no-sew DIY face mask, follow the directions below!
- Lay a flat sheet down on a large table or floor
- Start on the side hem (small folded part on the side of the bedsheet) and measure 13 inches across and 5 inches down. This creates the face covering.
- Using the inner rectangle cutout on the bedsheet, start cutting ½ inch wide strips measuring 12 to 17 inches in length. You will need 4 ties!
- Take a large paper clip and straighten it or cut one pipe cleaner into three sections.
- Thread the straightened paper clip or pipe cleaner into the hem of the cutout rectangular face mask and glide it to the middle of the hem. This creates a moldable nose piece.
- Lay the mask down facing you and make a ½ inch fold on both sides of the rectangle. Use scissors to make a small slit (roughly ½ inch from the bottom and top).
- Insert the ½ inch wide tie strand through the holes and knot each end.
- Staple along the folded side to secure the fold and tie strands.
https://youtu.be/q8GwjVihGj4
Remember: Measurements may need to be adjusted to accommodate a small child!
Although this face mask has more steps than the other two methods, it has the advantage of inserting a moldable nose piece to receive a snugger fit. Because of the staples, pipe cleaner, or paper clips, these DIY masks are hand wash only. If you repeat these same instructions, you will get multiple masks out of one bedsheet. (Face mask design curtesy of Mask Builders).
Use a Face Mask to Protect Your Child
To help slow and eventually stop the spread of the virus, the Center for Disease Control is now telling the general public to wear cloth coverings as a face mask. HOWEVER, DIY face masks are not a substitute for social distancing and hand washing.
Like everyone else, children need to understand what social distancing entails and why we are quarantining. While we may be stuck at home, children still need to learn the proper way to wash their hands to decrease your family’s chances of illness.
When you do have to leave your home for essential items, you can have the confidence in knowing one of the three no-sew children’s face masks is protecting your child as well as the public from the virus.
 By Liz Talton